Tips
Tips about the package and localization
Editor Menu
You can quickly access localization tools through the Unity menu bar. Navigate to Tools -> Evo Localization to access:
- Open Localization Settings: Opens the Localization Settings asset.
- Open Table Window: Opens the Table Window for editing content.

Language Toolbar
You can enable the Language Toolbar, which lets you quickly switch languages during runtime for easier testing.
You can enable it by opening the toolbar menu and navigating to the Evo Localization section.
You can hold the Ctrl key to move it elsewhere, or right-click it to hide it.

Documentation Shortcut
You can click the Help icon to open the documentation page for that specific component.

Recommendations
- Use Meaningful Keys: Use descriptive keys like
menu_start_buttoninstead of generic names likekey1. This makes content easier to find and manage. - Organize Tables: Group related content (UI, Gameplay, Dialogue) into separate tables to keep lists manageable and organized.
- Enable Fallback: Keep Use Fallback enabled on Localized Objects to prevent missing content from breaking the UI.
TMP Font Fallbacks
Some languages, such as Japanese and Korean, use special character sets that are not available in most fonts. When TextMeshPro tries to render characters that are missing in the font asset, it will display a blank square instead.
The proper way to solve this is to replace the font asset attached to TMP objects. Evo Localization includes a component that does this natively. See the 'Font Swapper' section to learn more.
However, you can also use TMP Fallback Font Assets feature to solve this quickly and easily.
Select a TMP font asset
Locate the Fallback Font Assets sections
Add necessary fonts such as NotoSansJP, NotoSansKR, etc.
Alternatively, you can add global fallback fonts by searching for 'TMP Settings' in the Project window.
If you want to learn more, you can watch this YouTube tutorial that explains everything:
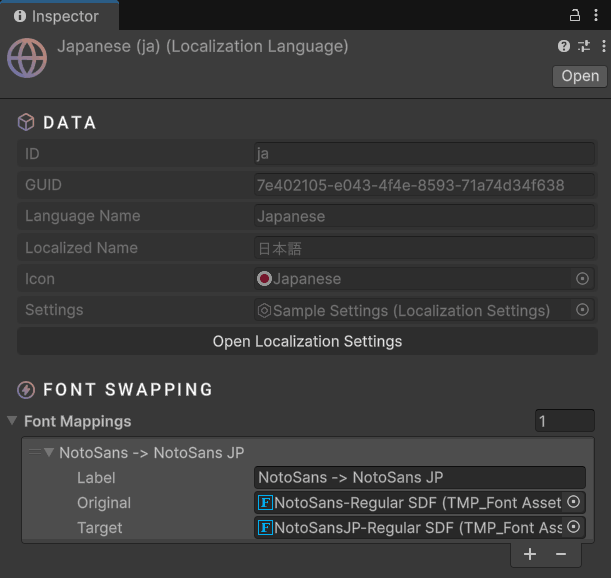
Font Swapper
This component swaps the TMP font asset of the attached TMP object based on the selected language. It effectively solves the issue of missing characters (often displayed as square blocks) caused by unsupported font glyphs.
For example, you might be using a font that handles most Latin alphabets well (such as Noto Sans), but want to support Japanese. If the current font does not include Japanese glyphs, you can select the Japanese language asset, create a new font mapping, and redirect the font to another one (for example, Noto Sans -> Noto Sans JP).
You can create separate mappings for each variant (Light, Bold, etc.). This provides a flexible solution without requiring you to add fonts to TMP fallback assets.
Select a TMP object
Click 'Add Component'
Search for 'Localized Font Swapper' or navigate to the Evo category
Add this component to each TMP object you want to be swapped
Done! You can now manage font mappings by selecting the language asset